Quantum ATK
QuantumATK v2019.12 is already available on Hazeem.
If you need QuantumATK on Raad2, or the latest version of QuantumATK to be installed on Hazeem, feel free to contact us
For any other version, please follow the below procedure to install QuantumATK under your home directory, or project directory.
Pre-Requisites
- Own a QuantumATK license. This application is a commercial product. RCCL does not provide any QuantumATK license presently.
- Have a Synopsys SolvNetPlus account. If you don't have one, you can create it here
Installation steps
This procedure is based on Synopsys Vendor Procedure.
You can refer to it if you need more details, or if you want to install the application on a non-Linux target.
1) Preparation (optional)
You can arrange your directory structure as you wish, but the one shown below will ease your installation process
The SCL version does not need to be exactly the same as the ATK version you want to install. However, the closer they are, the less risk of potential incompatibility issue.
2) Install the Synopsys Common Licensing (SCL)
In order to install QuantumATK on Hazeem, Synopsys Common Licensing (SCL) must be installed first.
- Login to your Synopsys SolvNetPlus account and go to the Downloads section
- Download the SCL .spf files, and place them into your src folder (or wherever you prefer)
- You should get 2 of them, scl_v2023.09_common.spf and scl_v2023.09_linux64.spf (the name depends on the version you want to install)
- These .spf files should not be renamed, otherwise Synopsys Installer will not recognize them as valid
- Place these files in your src folder (e.g. ATK/SCL/v2023.09/src)
- Download the latest version of Synopsys Installer: https://www.synopsys.com/support/licensing-installation-computeplatforms/installation.html
- Inside the downloaded folder, you will find an installer and a .run file.
- If a text-based interface is preferable for you, just execute the .run file named SynopsysInstaller_vX.X.run
- In your terminal type:
./SynopsysInstaller_vX.X.run - The process will ask for the desired installation path and will quickly install SCL at that location
- In your terminal type:
- If you prefer a graphical interface, type in your terminal:
<installer_path>/installer -gui- Make sure the following window has now been opened:
- If a text-based interface is preferable for you, just execute the .run file named SynopsysInstaller_vX.X.run
- Fill the fields: Site ID Number, Site Admin, Contact info
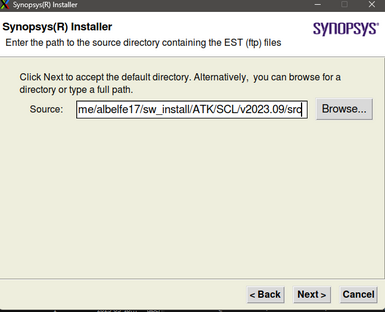
- Point the installer to the folder containing the .spf files you downloaded earlier (e.g. ATK/SCL/v2023.09/src)
- Point the installer to your install directory (e.g. ATK/SCL/v2023.09/install)
- Tick the box in front of the product(s) you want to install
- Again, point the installer to your install directory (e.g. ATK/SCL/v2023.09/install)
- Click on Accept, Install
- The installation of the SCL should be complete
3) Install QuantumATK
- Download QuantumATK
- Log on to SolvNet
- From the SolvNet front page, click Downloads or go directly to https://solvnet.synopsys.com/DownloadCenter
- Under My Product Releases choose the QuantumATK package assigned to your Site, i.e. a name of the form QuantumATK xxxxxx
- Choose your desired product version from the list of available versions. i.e. the V-2023.12 version.
- After reading the legal page, click on “Yes I agree to the above terms.”
- Click the Download button next to the QuantumATK installation file corresponding to your operating system.
- You should now have a file named like: quantumatk_vV-2023.12_common.spf
- Place it into your ATK/2023.12/src folder
- Install QuantumATK
- To install QuantumATK, you need a working installation of SCL (refer to previous section)
- Run the installer from your SCL folder; e.g:
ATK/SCL/v2023.09/src/installer -gui
- This time you will use it to install QuantumATK
- Fill the fields: Site ID Number, Site Admin, Contact info
- Point the installer to the folder containing the quantumatk_vV-2023.12_common.spf you just downloaded, e.g. ATK/2023.12/src
- Point the installer to your install directory, e.g. ATK/2023.12/install
- Select the product(s) you want to install
- Accept the license
- Again, point installer to your install directory ATK/2023.12/install
- Select your favorite options then click on Accept, Install
The installation should be complete:
- If you selected runafterinstall, the app will be launched automatically after the installation is over
- At this point, you might have to set up your license
- Select "I have a license" if you have one, then provide the path to the license, and you are good to go
- Otherwise, select "I want to connect to a license server"
- Enter your license server info, e.g.:
- That's it.
- If the connection to the license server you mentioned is established, you can use QuantumATK


